
ピンポイント™ナノメカニカルモード
ピンポイント™ナノメカニカルモードでは、ナノメカニカル特性の最高の解像度と精度を実現します。剛度、弾性率、粘着力をリアルタイムで同時に取得できます。XYスキャナーが停止している間、接触力、先端と試料間の接触時間を明確に制御することで高速度フォースカーブが得られます。データを取得する時間を制御できることから、ピンポイント™ナノメカニカルモードでは、様々な試料の表面において高いS/N比で最適化されたナノメカニカル測定を行うことができます。

ピンポイント™ナノメカニカルモードでは、ナノメカニカル特性の最高の解像度と精度を実現します。剛度、弾性率、粘着力をリアルタイムで同時に取得できます。XYスキャナーが停止している間、接触力、先端と試料間の接触時間を明確に制御することで高速度フォースカーブが得られます。データを取得する時間を制御できることから、ピンポイント™ナノメカニカルモードでは、様々な試料の表面において高いS/N比で最適化されたナノメカニカル測定を行うことができます。
Atomic force microscopy (AFM) has become a fundamental tool for studying nanomechanical properties such as Young’s modulus and adhesion force on a nanometer scale for a variety of samples like polymers, 2D materials, or living cells. Traditionally, force-volume mapping is used to measure quantitative mechanical properties. For that, isolated force-distance measurements are conducted at a defined number of pixels. The cantilever is pressed onto a surface, until a previously defined threshold, the setpointforce, is reached. Both during the approach and retraction, the cantilever deflection is measured as a function of the z height.
Subsequently, the cantilever is moved to the next pixel where another force-distance curve is measured (see Figure 1(a)). Conventionally, it takes at least a few hundred milliseconds to collect a single force-distance curve, which scales up to several hours when recording whole images with thousands of pixels
To overcome the time-consuming limitations of force-volume mapping, Park Systems developed the PinPoint nanomechanical mode, where the Z scanner approach and retraction are accelerated by a factor of ten compared to conventional force-volume mapping while maintaining high precision and accuracy. Similar to regular AFM scanning mode, a customizable channel selection allows obtaining various quantitative mechanical data in combination with high-resolution topography, as well as functional electrical data like conductivity, capacitance, etc. The automated analysis of the force-distance curves via Park Systems’ SmartScanTM software allows for a real space visualization of nanomechanical data during the scan.
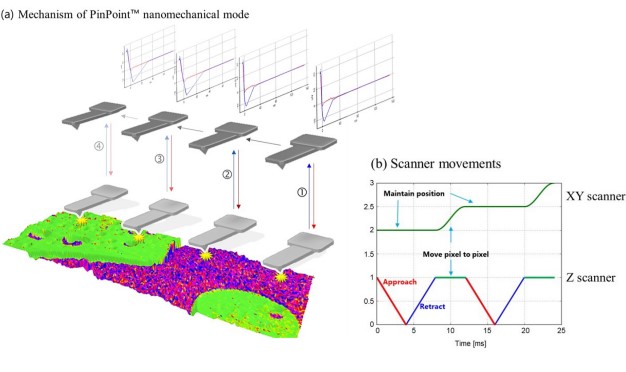
Figure 1. (a) Schematic diagram of Park Systems’ PinPoint nanomechanical
mode: the tip approaches the sample and retracts at each pixel before
moving to the next pixel. The resulting force curves and their automated
analysis allow real-time visualization of nanomechanical properties. (b)
Positions of XY and Z scanners during PinPoint nanomechanical mode
scanning.
As depicted in Figure 1(b), decoupled XY and Z scanners enable precise movements during PinPoint nanomechanical measurements with minimized crosstalk between lateral and horizontal movements. Thus, in contrast to traditional contact mode, PinPoint nanomechanical mode eliminates lateral shear forces which drastically reduces damage to the tip or surface, while establishing a defined physical contact, that enables precise nanomechanical measurements. Accordingly, users can simultaneously image surface topography as well as mechanical properties such as modulus, deformation, adhesion, energy dissipation, and stiffness. Table 1 (next page) summarizes all selectable channels that can be recorded using PinPoint nanomechanical mode.
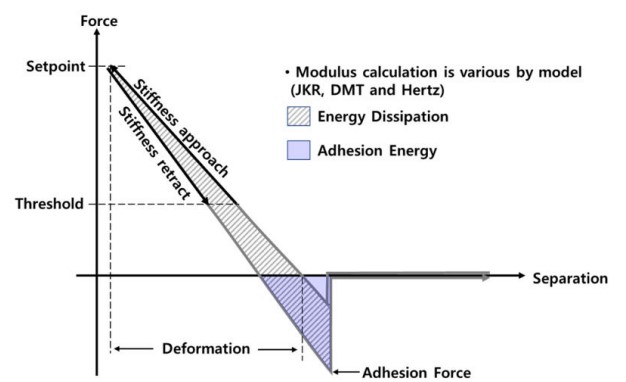
Figure 2. Mechanical properties derived from the force-separation curve:
stiffness are determined from the sample indentation, the adhesion force
and energy are calculated from the retraction curve and the energy
dissipation is given by the hysteresis between approach and retraction.
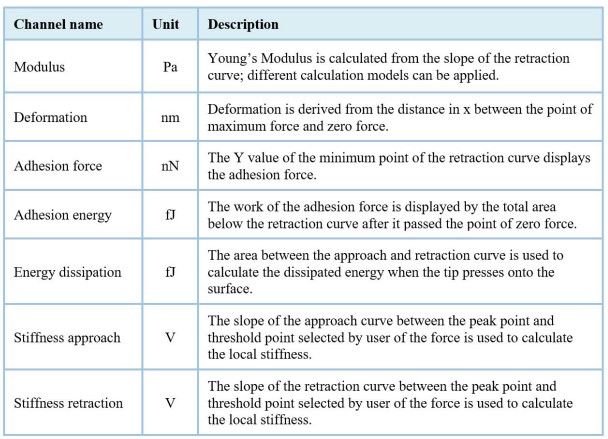
Table 1. Channels information of the PinPoint™ nanomechanical mode.
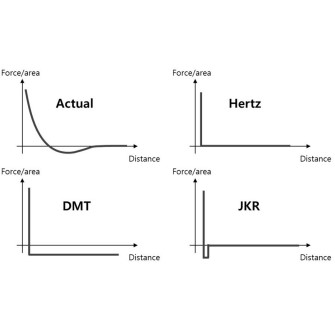
Figure 3. Comparison of the three modulus models offered for the modulus
calculation in the SmartScanTM software and an actua forcedistance curve.
Korayem, M. & Rastegar, Zahra & Taheri, Marzie. (2012). Sensitivity
Analysis of Nano-contact Mechanics Models in Manipulation of Biological
Cell. Nanoscience and Nanotechnology. 2. 49-56.
10.5923/j.nn.20120203.02.
Hertzian model (Non-adhesive elastic contact): elastic deformation without
adhesion. DMT model (Adhesive elastic contact): elastic deformation with
adhesion in retraction. JKR model (Adhesive elastic contact): elastic
deformation with adhesion in retraction.
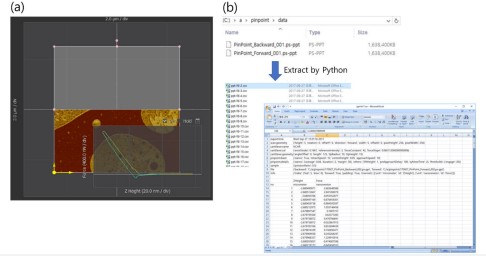
Figure 4. (a) Real-time FD curve on scan area (b) FD curve extracts for
post analysis.
For the internal and automated calculation of Young’s modulus, Park Systems offers three optional contact mechanics models as shown in Figure 3. Depending on the sample’s elastic and adhesive properties, either the Hertzian-, JKR-, or DMT-model yields the most accurate results. Hard samples that exhibit very little adhesion and deformation with contact force are best fitted with the Hertzian model. In the case of hard samples (modulus is over 1 GPa) with significant surface adhesion, it is recommended to use the DMT model. The JKR model is recommended for soft samples with high surface adhesion. Since PinPoint™ nanomechanical mode enables users to monitor force-distance curves in real-time as demonstrated in Figure 4(a), the choice of contact mechanics model can be optimized during imaging depending on the requirements of the experiment and the respective shape of the force-distance curves. For additional analysis of the force distance curves obtained during PinPoint nanomechanical mode, the whole data set can be saved separately. Figure 4 (b) shows an example of curve extraction using python software.
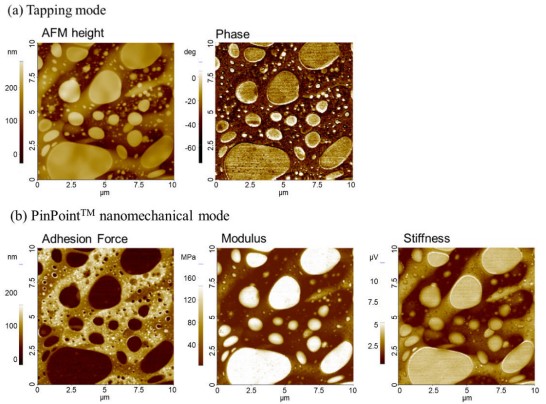
Figure 5. (a) Phase imaging in tapping mode and (b) PinPoint™
nanomechanical mode results of polystyrene -polybutadiene block copolymer
(PS-PB) in the same measurement area.
To achieve quantitative nanomechanical data, every cantilever needs to be calibrated in regard to its sensitivity and spring constant prior to the measurements. A reliable sensitivity calibration requires hard reference samples (e.g. sapphire) that will not deform. Furthermore, the force constant of the cantilever needs to be considered (see App note #44: “Proper AFM cantilever selection depends on sample properties”). For quantitative modulus calculation, the cantilever tip must cause sufficient deformation of the sample without applying to high loading forces, while maintaining a high force sensitivity. Accordingly, the force constant of the cantilever needs to match the stiffness of the sample. As a rule of thumb, Park Systems recommends hard cantilevers for hard samples and soft cantilevers for soft samples, as described in Table 2.
Qualitative differences in mechanical properties can also be observed in the phase channel in standard tapping mode. However, phase imaging neither allows distinguishing between differences in local stiffness and adhesion nor offers quantitative modulus data. To illustrate the capabilities of PinPoint compared to phase imaging, Figure 5 presents two data sets on the same polymer blend of polystyrene and polybutadiene: the first data set was collected via phase imaging (Figure 5(a)) and the second was collected in PinPoint nanomechanical mode (Figure 5(b)). Whereas the phasecontrast mainly resolved the material distribution, PinPoint delivered quantitative data on adhesion, modulus and stiffness.

Table 2. Recommended AFM probes for samples with different mechanical
properties.